Oracle has provided plenty of documentation on how to upgrade your OBIEE 10g environment to their new 11g platform. They've even outlined the process of configuring a new instance of Usage Tracking on a new 11g environment - outlined here. What I haven't been able to find is the ability to take an existing Usage Tracking environment in OBIEE 10g, and port it over to the new 11g environment. The upgrade assistance tool won't work because the data model for Usage Tracking has actually changed between the two versions. This guide is going to cover the process of:
Taking an existing OBIEE 10g Usage Tracking environment
Making the necessary changes to the Usage Tracking data model
Applying the configuration changes in weblogic to enable Usage Tracking in OBIEE 11g
Step 1: Make changes to existing OBIEE 10g Usage Tracking RPD
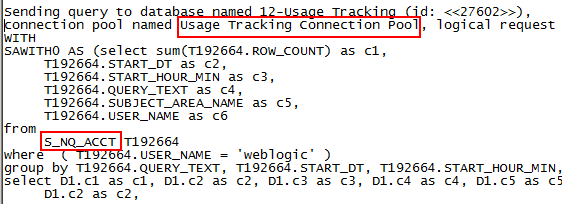
The data types and nullable check box have changed for nearly every column in Usage Tracking's primary table: S_NQ_ACCT. Using the Admin Tool, modify each column as outlined below:
Step 2: Modify Physical Data Model
I've noticed on some engagements that the NQ_LOGIN_GROUP table may not always be deployed. I don't think this is an 'out of the box' table but rather something manually deployed to track the applicable group of an individual user. Note that as you move to the application role based security model you'll no longer need this table. In the event that you do need this backwards compatibility, you'll need to fix the broken link - which is made evident by the red line that appears when you attempt to display the physical data model:
You'll need to make the physical join on NQ_LOGIN_GROUP.LOGIN = S_NQ_ACCT.USER_NAME
Step 3: Enable Usage Tracking in Enterprise Manager
It's at this step where Usage Tracking implementation differs dramatically between OBIEE 10g and OBIEE 11g. In the 10g platform, Usage Tracking was enabled by modifying the nqsconfig and instanceconfig files, but with the advent of Oracle's Enterprise Manager you must now go through EM's MBeans configuration to enable the tool. To Oracle's credit, they did provide a detailed guide on how to enable Usage Tracking in EM . Rather than re-invent the wheel, i'm going to defer everyone to the section titled 'Configuring Usage Tracking in Enterprise Manager'. We're past the 'OBIEE 10g' upgrade so Oracle's guide is more than appropriate.
Step 4: Deploy Usage Tracking Tables to Your 11g Database
Most implementations use the DEV_BIPLATFORM that come pre-populated with the S_ETL_DAY, S_ETL_TIME_DAY and S_NQ_ACCT tables, but if your version did not, or you're not using the default schema, run the following scripts located at the following directory:
The Oracle BI Presentation Services Go URL command is for use in incorporating specific Oracle Business Intelligence results into external portals or applications. The Go URL is used when you add a result to your favorites, or add a link to a request to your dashboard or an external Web site. It has a number of forms and optional arguments that can be used to control its behavior. Oracle has provided limited documentation on goURL parameters and with use cases that require end users to navigate to specific dashboards or request dashboards be embedded into pre-existing web pages, i've decided to create a Primer on commonly used GoURL functionality: Common goURL Parameters:
Parameters
Syntax
Definition
NQUser
&NQUser=x
User ID
NQPassword
&NQPassword=x
Password
Path
&Path=x
Path of the answer to execute. You can find it in the properties page (Answers/Manage Catalog/ and click on the properties icon (a little hand) of the object that you want. See picture above
Link Options
&Options=x
The x can be one or more of the following letters:
* m : Modify Request
* f : Printer Friendly
* d : Download to Excel
* r : Refresh Results
Printer Friendly
&Action=print
Results are in a printer-friendly format, without the paging controls, hot links, and so on.
Passing Filters
&Action=Navigate
To apply filters to the answer (see section below on Passing Filters)
Application Friendly
&Action=Extract
&Action=Scroll
Results are displayed in an application-friendly format, such as for Microsoft Excel, without the paging control, hot links, and so on. The Extract action also acts as a Navigate action (read Passing Filters to the Oracle BI Presentation Services Go URL Through a URL (Navigation)) so you can filter the results that are returned by the call.
Specific View
&ViewName=x
This shows an individual result view rather than the default compound view
Specific View
&ViewID=go~x
This shows an individual result view rather than the default compound view where x is the name of the view
Specific Style
&Style=x
This shows the results using a specified style. If the style does not exist, the default is used.
Result Format
&Format=x
This controls the format of the results. This is the format, where x can be xml, html, txt (tab separator), csv (comma separator)
File Extension
&Extension=.csv
This controls the file extension of the download file
Language
&Lang=fr
This controls the language of the report. The value permitted are the values of weblanguage
done
&done=portalPages
parameter allows you to create a return link equal to a path that you have specified
Passing Filters
You can use the &Action=Navigate in conjuction with the with the parameters below to pass filters directly to a report via goURL. Use &P0=n where n equals the number of parameters you wish to filter and P1...to P6 with the one or more of the operators below:
Operator
Meaning
eq
Equal to or in.
neq
Not equal to or not in.
lt
Less than.
gt
Greater than.
ge
Greater than or equal to.
le
Less than or equal to.
bwith
Begins with.
ewith
Ends with.
cany
Contains any (of the values in &P3).
call
Contains all (of the values in &P3).
like
You need to type %25 in place of the usual % wildcard. See the examples that follow.
top
&P3 contains 1+n, where n is the number of top items to display.
bottom
&P3 contains 1+n, where n is the number of bottom items to display.
bet
Between (&P3 must have two values).
null
Is null (&P3 must be 0 or omitted).
nnul
Is not null (&P3 must be 0 or omitted).
&P2=ttt.ccc
In this parameter, ttt is the table name and ccc is the column name.
If the table or column contains spaces, it must be quoted with double-quotes.
Spaces should be escaped as %20, for example, Measures."Dollar%20Sales".
&P3=n+xxx+yyy+...+zzz
In this parameter, n is the number of values, and xxx, yyy, and zzz are the actual values. Note: If the value of P3 begins with a numeric character,
the entire value must be enclosed in quotes.
example: saw.dll?Go&Path=/Shared/Test/SB2&Action=Navigate&P0=1&P1=top &P2=Customers.Region&P3="7
Passing Filters Examples:
his returns records for the East and Central regions:
The Go URL command can be used to issue Oracle Business Intelligence SQL. These forms of the Go URL return tabular results. The basic options from &Style= and &Options= can be used here as well.
To issue Oracle Business Intelligence's simplified SQL, include the escaped SQL as a parameter to the Go URL. For example:
With production costs associated to flat screen LCD/plasma/LED TVs dropping into the 100s of dollars over the past few years, these TVs are no longer relegated to the home theater space. Now enterprises can utilize these products as part of their campaign to bring analytics to the forefront of their business. Consider the following scenarios:
A call center needs a mechanism to communicate performance metrics to the office without daily emails, meetings and paper-printed dashboards
An IT organization needs to track hardware utilization 'in real time' with passive notifications activated during peaks and irregular activities
The firm's testing team needs the ability to communicate defect and resolution metrics against service level agreements across multiple teams
Short of daily emails and unnecessary meetings, it was up to the individual worker to take the initiative to stay informed. The above scenarios can be effectively resolved through the use of 'Dashboard Displays' on flat screen TVs strategically placed throughout the office to keep leadership informed and team members accountable.
When we think of how OBIEE is used, the typical scenario that comes to mind is a user logging into the analytics front page. While little documentation exists, it is certainly possible to transform OBIEE from a 'user-based interactive analytics tool' to a 'dashboard style display fitted to large monitors'.
The main issue OBIEE Architects face is how resolve the issue of stale data across the technology stack. Stale data can exist within the BI Server, BI Presentation Services and even in the browser. Each component has its own resolution technique as well as potential issues. When a dashboard is displayed on a static monitor, a mechanism must be in place to ensure it's refreshed and timed correctly with existing agents.
This guide is going to outline the steps required to implement OBIEE for the above scenarios. The technology used includes:
iFrame Bursting (disabled by default in OBIEE 11g)
Oracle WebLogic to redeploy modified XML components
goURL
HTML (Meta Tags)
Oracle BI 11.1.1.7.0
Some blogs on the web recommend using javascript to achieve this but I do not recommend this approach as javascript execution is based on the permission of the browser and has the potential to be disabled. At the very least a pop up box will appear asking the user if they authorize the javascript function to execute - not a pleasant end user experience.
Furthermore, Oracle has acknowledged that the mechanism they developed for auto-refresh does not work and no known resolution exists - see Doc ID 1416002.1 and Bug 13058029. What is interesting is that Oracle's method used to work in OBIEE 10g!
Step 1: Enable iFrame Bursting
By default, OBIEE 11g server does not allow dashboards to be displayed in an iFrame. The reason this is done is to better secure the dashboards and prevent hackers from using an iFrame to overlay malicious content.
Step 1.1. Navigate to export/obiee/11g/instances/instance1/config/OracleBIPresentationServicesComponent/coreapplication_obips1 and modify instanceconfig.xml
/export/obiee/11g/Oracle_BI1/bifoundation/jee and download analytics.ear
The analytics.ear file contains two war files that house the web.xml that needs to be modified.
Step 1.3 Modify web.xml
Decompress the analytics.war and analytics-ws.war file using 7zip and modify the web.xml in each war file by adding the red code to the file:
Note the two important components highlighted in red:
The Meta tags forcing the automatic refresh every 900 seconds.
The iFrame that embeds the URL of your dashboard
So at the end of the day what do we have?
The ability to display dashboards on a static device (large monitor) that will have little human interaction but requires up to second (or in this case every 900 seconds) data
In a typical OBIEE engagement, the client may want to utilize out of the box or custom images within various dashboards and reports. This requirement leads to many open questions, including:
Where are these images located?
How do I embed the image into a dashboard or report?
How do I maintain the integrity of the image URL across multiple environments?
Let's break down each question one by one:
Where are these images located?
All images are stored in the 'browser look and feel plus' folder of the BI Server, you've probably seen this notated as 's_bflap'. This folder exists in two locations and it is critical that any image you upload be housed in both:
How do I embed the image into a dashboard or report?
OBIEE 11g has a little known feature called 'fmap' which can be used to display an image based on the relative URL of the image. Little documentation exists on it other than a few notes released by Oracle which include:
How To Display Custom Images Using Fmap In OBIEE 11g (Doc ID 1352485.1)
Image FMAP on Linux (Doc ID 491154.1)
How do I maintain the intregrity of the image URL across multiple environments?
Here is where things get tricky due to the lack of documentation that exists. Let's say you want to use the image 'report_good_percentage.jpg' located in the s_blafp folder:
So as outlined in Oracle's documentation you use 'fmap:report_good_percentage.jpg' or even 'fmap:images/report_good_percentage.jpg', but to your dismay all you see is a broken image link:
Why?
It is important to remember that fmap displays the image of the relative URL. So what does relative mean? What is 'it' relative to? In regards to fmap, the relative URL is the root directory of the analytics web server, which in OBIEE 11g is:
Which makes sense if you understand how applications are deployed in weblogic. The presence of the WEB-INF directory in the aforementioned folder is how Weblogic determines if a folder if a deployable application directory.
So - if we work under the assumption that the above folder is indeed the root directory, then it we now know why the image returns a broken link, report_good_percentange.jpg is not stored in the 'root' directory of the analytics web server, it is actually stored in:
Let's take a look at the URL that's actually being generated:
Notice anything funny? Why is OBIEE 11g adding a 'Missing_' folder to the URL directory? Countless bloggers have theorized this as a bug in OBIEE and some even suggest making a 'Missing_' folder in the root directory of the analytics web server. I don't think that is the best approach because as you deploy this application across multiple servers, you'll have to make sure all environments have that same folder. Keep it simple right?
We can resolve this by modifying the fmap url to revert one directory closer to its root by using '/..':
Let's check the URL being generated just to make sure:
The image displays, and the 'Missing_' folder is no where to be found. If your requirements have extensive image customizations, perhaps changing the entire look and feel, I recommend deploying an entirely new skin as outlined in Oracle Note: How to Use Custom Images in OBIEE (Doc ID 1484623.1)
One of the great features of Oracle's Business Intellgience 11g foundation is the ability to integrate external applications via an API call or through the use of javascript libraries. In a previous article I discussed how to utilize javascript functions using OBIEE 11g's native UserScripts.js. Today we're going to expand on this functionality by integrating third party data visualization scripts. One popular javascript library used for data manipulation is 'Data-Driven Documents' . This open source scripting library gives users the ability to manipulate data using methods not available in OBIEE 11g. Kevin McGinley first wrote about this in 2012 and the guys over at Rittman Mead recently posted an overview of D3 / OBIEE integration. Below we're going to cover all the steps required to implement a D3 visualization technique.
Before we get started, you can view all of the D3 visualization methods at their github. In the example below we're going to use airline data to and D3's Calendar View to visualize average flight delays. You will need OBIEE 11.1.1.6.2 or higher (this example uses OBIEE 11.1.1.7.0) and IE 9+.
Step 0: Create an Answers Report
This report should contain a year dimension, a date dimension and an aggregate fact column. In the airline example I've selected 'Date', 'Year' and 'Average Departure Delay'. Take note of the column order as you will have to reference the column number in a narrative.
Step 1: Download the D3 Javascript Library from github
This is going to download a 'd3-master.zip' file that contains all of the javascript libraries needed for integration. You will unzip all of these files into OBIEE 11g's analytics ear deployment under Weblogic's Domain Home located at :
The Calendar view's javascript code is basically one script, with one function and one css file. These 'chunks of code' are all stored in the index.html using the example located on github, but in order for this view to play nice with OBIEE 11g, we're going to need to dissect components of the code into isolated narratives and css files. The first step is to take the css code:
#chart {
font: 10px sans-serif;
shape-rendering: crispEdges;
}
.day {
fill: #fff;
stroke: #ccc;
}
.month {
fill: none;
stroke: #000;
stroke-width: 2px;
}
and save it to its own css file (calendar.css) located at:
user_projects\domains\bifoundation_domain\servers\bi_server1\tmp\_WL_user\analytics_11.1.1\7dezjl\war\res\b_mozilla\common\d3\examples\calendar\calendar.css (you will need to create the directory as this doesn't exist)
Step 3: Create an Answers Narrative to Execute the Javascript Library
Now that we've laid the groundwork for calling the D3 library, the next step is to integrate the Calendar View code into an Answers narrative.
First create the script headers and link type to call the javascript library. This code will be stored in the pre-fix of the narrative:
Next we're going to take the calendar view code and copy the entire code block from the start of the width variable delcaration to the end of the call to the selectAll function. Your code should look similar to:
Although this code does most of the heavily lifting and can be left unmodified, there are specific lines that can be changed and updated dynamically via the use of presentation variables.
Color Thresholds:
The color variable specifies the thresholds for red/yellow/green. In this case I deem the min and max ranges of an airline delay to be between 5 minutes and 30 minutes:
The height/width/cell size can be adjustable by changing the hardcoded values to presentation variables such as:
@{Width}
@{Height}
@{CellSize}
Date Formatting:
The 'day' variable responsible for date formatting:
var day = d3.time.format("%w"),
week = d3.time.format("%U"),
percent = d3.format(".1%"),
format = d3.time.format("%Y-%m-%d");
Requires that the format of the date be specified. The Calendar View script by default uses a 'YYYY-MM-DD' format. If your OBIEE data is a MM-YY-DD format or has a timestamp, you will need to modify the column data format to the following:
Modifying the Date Range:
The Calendar View code by default hard codes a date range of 1990 to 2011. You will most likely need to modify these values for your data set create a presentation variable that allows the users to change the date range dynamically:
var svg = d3.select("body").selectAll("svg")
.data(d3.range(1990, 2011))
Could be modified to:
var svg = d3.select("#my_chart").selectAll("svg")
.data(d3.range(year_range1, year_range2))
In the upcoming steps I will show how these variables can be called.
Step 4: Populate the Narrative and Post-Fix
In the narrative you will need to specify the Date and Metric you want to pass to the javascript function using the corresponding column number (see step 0 if you forgot!)
The Post-Fix should contain the remainder of the Calendar View code. This can remain unmodified:
Step 5: Create a Second Narrative for the Date Range
This narrative is optional, but assuming you want to give the user the ability to modify the date range, you would take the variables you referenced in the 'Modifying the Date Range' section (in my case year_range1 and year_range2) and set both of them equal to two presentation variables like below:
Step 6: View Narratives in Answers
Adding both narratives to a single view, your end result should look similar to:
This guide barely scratches the surface of D3-OBIEE integration but serves as a great example of how 3rd party APIs and javascript libraries can be integrated into OBIEE 11g. I encourage all BI Architects to look through the entire D3 library and see how D3 can be integrated into their current engagement.
The ability to execute SQL statements directly against the data warehouse, also known as 'Direct Database Requests' is not new to OBIEE 11g. Usually used a last resort, the direct database request has many limitations including:
Physical SQL statement is always executed
Does not utilize OBIEE 11g's BI Server engine for maximum query optimization
Increased run time
None the less, if a client has a specific reporting requirement that cannot easily be tied into an existing data model, then the direct database request becomes a viable alternative.
As most OBIEE Architects know, to enable Direct Database Requests is done within Answers in the 'Manage Privileges' Section:
After applying the above security privilege, the 'expected result' is for a member of the applicable application role to be granted the ability execute direct database reports. Which in turn leads to a surprise when the user is still unable to execute a direct database request.
Error Codes: OPR4ONWY:U9IM8TAC:OI2DL65P State: HY000. Code: 10058. [NQODBC] [SQL_STATE: HY000] [nQSError: 10058] A general error has occurred. [nQSError: 43113] Message returned from OBIS. [nQSError: 13017] User or application role has not been granted the Direct Database Access privilege to access the database. Please verify the User/Group Permissions in the Oracle BI Administration Tool.Please have your System Administrator look at the log for more details on this error. (HY000) Please have your System Administrator look at the log for more details on this error.
Why?
What many developers forget to remember is that components of security are still managed within the repository, even in OBIEE 11g.
The ability to control who can execute direct database requests is managed within the Admin Tool's Identity Manager. For every applicable application role, you must grant direct database requests to each specific subject area:
Note that by default 'Execute Direct Database Requests' is set to ignore, which inherits privileges granted by its parent security role. This normally implies 'disallow'. By setting the the permission to 'allow' , you are granting the user the ability to run a direct database request against a specific subject area.
From a security perspective, granting access to specific subject areas is the preferred method of authorization when the alternative is a blank 'grant' or 'deny' via Manage Privileges.
As outlined in my primer on object level security & inheritance , inheritance applies but direct approval or denial supersedes any implied security rules.
In Oracle Business Intelligence (OBIEE) 11g, Oracle has fundamentally changed how we map users to various security privileges.In OBIEE 10g, Object Level Security was enforced using the USER session variable, which mapped to a GROUP session variable. This created a list of possible 'groups', which a developer would then apply security restrictions to, in either Answers (Managed Privileges) and/or Security Managed in the repository.
A high level flow is outlined below:
In OBIEE 11g, security authentication is enforced in the Weblogic Admin Server, and a user's security privileges are tied to their corresponding Application Roles in Fusion Middleware as shown in the diagram below:
The key take away is that object level security is applied to application roles and not groups. Why application roles? In Weblogic and Fusion Middleware, we can actually assign certain privileges to an application roles - we call these 'Application Policies'. For example, we can grant a certain application role the ability to 'edit the repository', or 'act as another user'. This feature, not possible in OBIEE 10g, now allows us to not only control what objects are being viewed, but also gives us the capability to control who can execute certain actions within the BI environment. This topic will be discussed in much greater detail in another guide.
Now let's go over the basic rules of Object Level Security for Application Roles in OBIEE 11g:
If a user is a direct member of an application role, they will have access to the reports allowed by that application role.
If a user is not a member of an application role, they will not have access to the reports allowed by that application role.
If a user is a direct member of two or more application roles with different security privileges for the same reports, the less restrictive security privilege is applied.
unless the user is explicitly denied. Explicit denial supersedes all security privileges.
If a user is a member of Application Role X, and Application Role X is a member of Application Role Y, the privileges in Application Role X supersede the privileges of Application Role Y
Let's cover each scenario in detail:
If a user is a direct member of an application role, they will have access to the reports allowed by that application role.
In this example, I granted Application Role 'Test Role 1' full control to folder 'Folder 1'. I then logged in as 'testuser1' who is a member of Application Role 'Test Role 1'. And as expected, testuser1 can read/write/edit/delete the folder.
If a user is not a member of an application role, they will not have access to the reports allowed by that application role.
In this example, I created 'Folder 2', only accessible by members of the 'BIAdministrator Application Role'. I then log in as a 'testuser1', which is not a member of the 'BIAdministrator Application Role'
As BIAdministrator:
As testuser1:
Note that in the above scenario, 'denying' the application role access accomplishes the same thing as taking no action onto the application role role (i.e. ignoring it completely)
If a user is a direct member of two or more application roles with different security privileges for the same reports, the less restrictive security privilege is applied.
In this example, I created Folder 3, which grants 'read' access to Test Role 1 and 'modify' access to 'Test Role 2'. 'Testuser1' is a member of both 'Test Role 1' and 'Test Role 2'.
As expected, Testuser1 has modify rights to Folder 3 (noted by 'X', ability to delete), despite being a member of Test Role 1 which only grants the user read access
If a user is a direct member of two or more application roles with different security privileges for the same reports, the less restrictive security privilege is applied.
unless the role is explicitly denied
In this example, TestUser1 is a member of Test Role 1 and Test Role 2 and Test Role 3. Test Role 1 grants testuser1 open rights, Test Role 2 grants testuser1 modify rights and Test Role 3 is explicitly denied.
As expected, testuser1 does not have access to Folder 4 because of Test Role 3
If a user is a member of Application Role X, and Application Role X is a member of Application Role Y, the privileges in Application Role X supersede the privileges of Application Role Y
In this example, testuser1 is a member of application role 'Test Role 4'. Application role 'Test Role 5' is a member of application Role 'Test Role 4'. Test Role 4 grants 'open' privileges to Folder 5 and Test Role 5 grants 'full control' to Folder 5.
As expected, testuser1 only has read/open access to Folder 5 even though Application Role 'Test Role 5' grants full control. This is because direct inheritance overrides indirect inheritance
Even if the inherited role explicitly denies access to folder 5, the user will still be able to access folder 5 because the direct role grants read/open access:
Note how testuser1 has modify access to Folder 5 (noted by the 'X') , despite inheriting a role that is denied access to the same folder.
These basic rules can be applied to any hierarchy, no matter how complex. Think you've mastered these 4 basic rules? Identify the final privileges for User 1 in the scenario below: