Showing posts with label database. Show all posts

Wednesday, December 19, 2018

Importing database dump files with impdp

In this guide, we'll cover how to import a DMP file into an oracle database using impdp:

Creating sample data viz and dashboards is a common request when we talk about 'the art of the possible'.  If we're lucky, we can use the "Sample Sales" data set provided OOTB with OBIEE and OAC. Since the beginning of OBIEE time, Sample Sales has served us well. Fast forward to 2018, we're seeing an increase in demos and proof of concepts with client/customer data, and it's not in excel files anymore.

We're getting data sets which are database extracts, commonly called DUMP files.   It's a single file representation of an entire data set within a schema, including tables, fields, permissions and the actual data. Importing dump files into an oracle database can be done via datapump the command line 'impdp'.

Here's how to import a dmp file to an Oracle 12c database. We'll be using command-line sqlplus and an  oracle 12c database which are both in a virtual machine running Oracle Linux. This can also be done using the Data Pump Import Wizard using SQL Developer.

Step 1. Know your database directories 

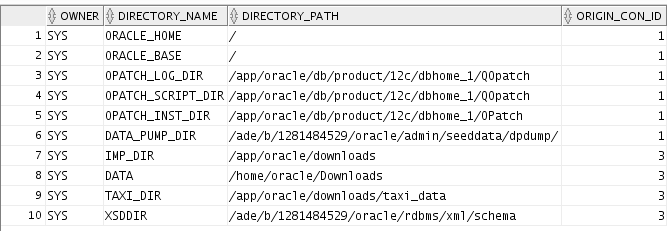
I found this to be the most common point of failure when importing data via impdp.  Know the dba directories within your oracle db by running. Make sure you're logged in as sysdba:

sqlplus sys as sysdba;
select * from dba_directories;


Step 2. Create and grant applicable privileges


CREATE USER BISAMPLE IDENTIFIED BY Helloworld123;
Creates a schema BISAMPLE with password Helloworld123.

GRANT CONNECT, RESOURCE, DBA TO BISAMPLE;
We are assuming that this user is a power user that can:

  1. Allows the user to connect and query the BIDEMO schema (connect)
  2. Allows the user to create named types for custom schemas (resource)
  3. Allows the user to not only create custom named types and alter and destroy them as well (DBA)
8.  GRANT READ, WRITE ON DIRECTORY DATA TO BIDEMO;
Gives BIDEMO user access to dba_directory 'data', in this example its located at /home/oracle/downloads

Step 3. Import the dump file


    impdp system@orcl full=y directory=DATA dumpfile=BISAMPLE.DMP
Running impdp via command line as outlined above will import the BISAMPLE.dmp file located in /home/oracle/downloads to the schema BISAMPLE.

Step 4. Verify the import

Take a second to log in as the user we created (BISAMPLE) and verify that the quantity of tables we imported are actually in the schema
    sqplus BISAMPLE;
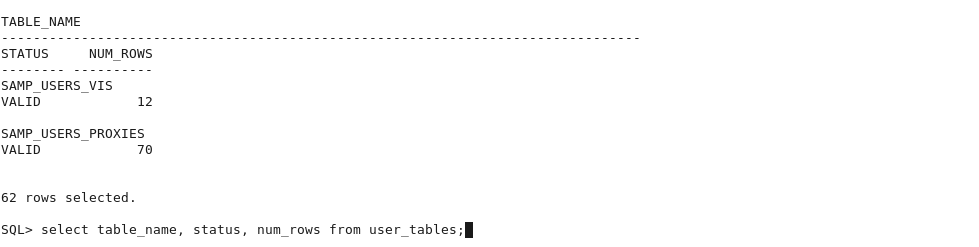
select table_name, status, num_rows from USER_TABLES;
In this import we expect to see 62 tables added to the BISAMPLE schema as verified below


Now we can use the awesome capabilities of Oracle Analytics to connect to this db to perform mash ups, analytics and advanced data viz! I know alot of you guys were asking this as a follow up to our earlier post on creating a shared folder w/in an Oracle Linux Virtual Box.  This post should help. Now you can:

  1. Create or receive a DMP file on your host machine, or via another user
  2. Transfer the DMP file to the target machine which contains the isolated oracle database
  3. Use the OBIEE 12c publically available image to create interactive reports, dashboards, data viz, and more! 
Happy demoing!


Monday, March 11, 2013

How-to: Direct Database Request Configuration OBIEE 11g

The ability to execute SQL statements directly against the data warehouse, also known as 'Direct Database Requests' is not new to OBIEE 11g. Usually used a last resort, the direct database request has many limitations including:

  • Physical SQL statement is always executed
  • Does not utilize OBIEE 11g's BI Server engine for maximum query optimization
  • Increased run time

None the less, if a client has a specific reporting requirement that cannot easily be tied into an existing data model, then the direct database request becomes a viable alternative.

As most OBIEE Architects know, to enable Direct Database Requests is done within Answers in the 'Manage Privileges' Section:


After applying the above security privilege, the 'expected result' is for a member of the applicable application role to be granted the ability  execute direct database reports. Which in turn leads to a surprise when the user is still unable to execute a direct database request.


Error Codes: OPR4ONWY:U9IM8TAC:OI2DL65P
State: HY000. Code: 10058. [NQODBC] [SQL_STATE: HY000] [nQSError: 10058] A general error has occurred. [nQSError: 43113] Message returned from OBIS. [nQSError: 13017] User or application role has not been granted the Direct Database Access privilege to access the database. Please verify the User/Group Permissions in the Oracle BI Administration Tool.Please have your System Administrator look at the log for more details on this error. (HY000)
Please have your System Administrator look at the log for more details on this error.
 

Why?


What many developers forget to remember is that components of security are still managed within the repository, even in OBIEE 11g. 

The ability to control who can execute direct database requests is managed within the Admin Tool's Identity Manager. For every applicable application role, you must grant direct database requests to each specific subject area:

Manage -> Identity -> Application Roles Tab -> Permissions


Note that by default 'Execute Direct Database Requests' is set to ignore, which inherits privileges granted by its parent security role. This normally implies 'disallow'. By setting the  the permission to 'allow' , you are granting the user the ability to run a direct database request against a specific subject area.

From a security perspective, granting access to specific subject areas is the preferred method of authorization when the alternative is a blank 'grant' or 'deny' via Manage Privileges.

As outlined in my primer on object level security & inheritance , inheritance applies but direct approval or denial supersedes any implied security rules.


keywords: identity manager, direct database requests, obiee 11g, answers, manage privileges, security, OPR4ONWY:U9IM8TAC:OI2DL65P

Saturday, September 22, 2012

How-to: Mapviewer Integration with OBIEE 11g (11.1.1.6 and higher)

I've seen quite a few articles on OTN and Google which outline how to configure Mapviewer for your 11g solution.  The problem is that many of these articles are:

1) overly complex
2) out of date

With the release of OBIEE 11.1.1.6, mapviewer comes pre-configured with weblogic and the only installation steps required are:

  • installation of navteq mapdata to your oracle database
  • establish a column based relationship between the map and a subject area

You do not have to modify any weblogic XML files, install any mapviewer jar files, or do any configuration within weblogic. Below is a step by step guide on how to configure and use mapviewer on your 11.1.1.6.x box:

Step 1: Download the mapviewer 'mvdemo' data into your Oracle database

Oracle provides pre-configured maps, coordinates, and navteq data that use can use in your reports. You need to download the MVDemo Sample Data Set .

Step 2: Create the mvdemo schema in your Oracle database

We're going to import the navteq map data into an mvdemo schema in step 3. Let's go ahead and create the mvdemo schema by typing the following command into your SQLPlus prompt:

grant connect, resource, create view to mvdemo identified by mvdemo

Note that you will need the appropriate privileges to create this account. If denied, try logging in as sysdba by typing the following command into sqplus:

CONNECT / AS sysdba

Step 3: Import navteq data dump to your Oracle database

Unzip the MV Demo Sample Data Set you just downloaded, and note the location of the 'mvdemp.dmp' file. This is the file we will import to the database.


Step 3.1)
Find the imp utility on your machine. It is usually located in your $ORACLE_HOME\product\11.x.x\dbhome_1\BIN folder

Step 3.2) Navigate to that folder via command line and run the following command:

imp mvdemo/mvdemo@ORCL file=mvdemo.dmp full=y ignore=y
where ORCL is your database SID
and file=mvdemo.dmp is the path (including mvdemo.dmp) to the dump file

You should get the following result:


Step 4) Import the map meta data

The Map Viewer Sample Data Set comes with city, county, state, highway, and other geographical map based data that you can impose onto the map. We're going to import this data set by running the following command in sqlplus:
:
@mvdemo.sql

Note that you must include the path of the mvdemo.sql file e.g. @C:\folder\folder1\mvdemo\mvdemo.sql

Step 5) Add your Oracle Database as a MapViewer Data Source

No, we're not doing this in weblogic - Mapviewer data source configuration is still done in your http://localhost:9704/mapviewer location


You'll arrive at a landing page like below, where you must click the 'Admin' button to log in:


5.1) login user your weblogic username/password

5.2) You should arrive at a home page with a link to view Datasources. Click it and you'll appear at:


Name = name/description of your data source
Host = hostname/ip address of your database
Port = database port number
SID = service ID of your oracle database (by default it is orcl)
user/password: If you followed my above steps, it will be mvdemo/mvdemo

# Mappers and Max Connections specify how many simultaneous users can connect to the MapViewer db. For diagnostic purposes I would make this relatively high, and once development is complete you can adjust as needed.

Step 6) Modify the mapViewerConfig.xml file to include the new data source

I'm a little surprised as to why this must be done manually, if anyone has any insight - please feel free to leave feedback. After you add the data source as outlined in step 5, you must then modify the mapViewerConfig.XML file to include said datasource, otherwise when the BI Server is rebooted, your datasource connection will be removed!

Luckily, this step is not too difficult

6.1) In :7001/mapviewer , log into your Admin screen and navigate to Management -> Configuration
Then add the following XML to the bottom of the config file, right above the </MappperConfig> line.


  <map_data_source name="mvdemo"
                   jdbc_host="db1.my_corp.com"
                   jdbc_sid="orcl"
                   jdbc_port="1521"
                   jdbc_user="scott"
                   jdbc_password="!tiger" 
                   jdbc_mode="thin"
                   number_of_mappers="3"
                   allow_jdbc_theme_based_foi="false"
   />


Modify each line using the inputs you provided in step 5, but in the jdbc_password input should have a ! infront of it as that is Oracle's indicator to encrypt the password upon restart.


Step 7)  Import a map layer into Answers 

We've completed all of the back end work required to create a map. Now we'll go into Answers -> Administration -> Manage Map Data and import a layer (theme) that we'll use for our map.

A theme is a visual representation representation of the data, and arguably the most important component in creating a map. In this example let's use the "THEME_DEMO_COUNTIES" layer, which will give us the ability to impose a dataset over various Counties in the USA.


Step 8) Specify the BI Column used to associate the THEME_DEMO_COUNTIES layer to a dataset

The theme we're using, "THEME_DEMO_COUNTIES" stores attributes of Counties (county name, county lines, etc) which we can visualize on a map. We need to identify a way to 'join' the data set in OBIEE to the dataset of THEME_DEMO_COUNTIES.

After saving the layer you just created, click the 'Edit' button (pencil) to bring up the screen below.


Notice there is 'Layer Key' with the following column values; County, Fips, Population, State.  We are going to use 'County' as the map column to join to the subject area.

Next we need to specify a column from our subject area which contains 'County'.  

Step 9) Specify the Background Map

In steps 7 and 8 we specified a theme (visual representation of the data) and identified how to join the map data to our subject area (via County column). Now we need to specify which map we're the theme will use.

In the 'Background' tab, create a new background map and specify 'DEMO_MAP' as the background map.


After saving, edit the map ensure the THEME_DEMO_COUNTIES has successfully been applied:

It will default to the middle of the USA but I decided to zoom into California :)


Step 10) Create a Report using the County Column 

Now we're ready to create the report! Create a new analysis, select the County column you specified in step 7, and a fact column which joins to the county dimension. Click the results tab, then New View -> Maps.  

The result below outlines only California because the dataset I created uses only California Counties. 


Note that I did not go into the MapBuilder tool, which you can use if you want to create custom themes and maps (e.g. map of a building, school, casino, etc). But this works great for a proof of concept!


keywords: obiee mapviewer, rendering maps, obiee configuration, obiee 11g maps, obiee navteq maps, obiee mapviewer integration

Tuesday, August 28, 2012

FYI: ORACLE_HOME Environment Variable and OBIEE 11g RPD error ORA-12154

Consider the scenario where you've been asked to install a fresh 11g stack on a server. A normal OBIEE 11g stack includes:

  • 11g database
    • Repository via RCU
  • 11g weblogic domain
    • Admin Server
    • Managed Server scaled out n times for each ManagedServer instance
  • OBIEE 11g (managed within the weblogic domain)
  • 11g presentation server
  • 11g client tools
Due to financial constraints, you've been asked to install the 11g database, 11g weblogic domain and 11g presentation server on a single server. This in its self is not an issue, and is common practice, especially for proof of concepts.

In a standard 11g database install, you'll set your $ORACLE_HOME variable to ..\.\
product\11.2.0\dbhome_1\
This is where you'll store your TNSNames.ora and SQLNet.ora files. These files are critical because they determine the database addresses needed for establishing a collection. Your default tnsnames.ora file will most likely include your localhost.  See below for an example:
Now you've installed the database, created the RCU and you're ready to install & configure Fusion Middleware (formally 10g's Enterprise Manager).
But wait! Fusion Middleware's Configuration Guide says create an ORACLE_HOME environment variable and set it to OBIEE 11g's database path:  app\11g\mw_home

See table below:
 
OBIEE 11g ORACLE_HOME
app\11g\MIDDLEWARE_HOME
Oracle 11g database ORACLE_HOME 
app\CookJR\product\11.2.0\dbhome_1
What do you do?
Keep your ORACLE_HOME environment variable set to your DB path and make sure any datasources you add as a physical layer of the RPD are added to the ORACLE_HOME db path and not the 11g ORACLE_HOME
This is critical because during the configuration of your OBIEE system within 11g you'll be required to set the ORACLE_HOME path twice:
  1. When you configure your Oracle Identity Store to utilize an external database
  2. When you update your tnsnames.ora file to contain the physical data sources of your connection pool within the RPD

If you fail to adhere to this policy, you will encounter the following error when you create a connection pool in your physical layer:

ORA-12154: TNS:could not resolve the connect identifier specified at OCI call OCIServerAttach. [nQSError: 17014] Could not connect to Oracle database. (HY000)


This is actually a known Oracle Bug (Search OTN ID 129637.01) and if you encounter this error , relax the fix is quick:


STEP 1: Edit registry under HKEY_LOCAL_MACHINE\SOFTWARE\ORACLE\<Oracle_Home> to make sure NLS_LANG key is set to a valid characterset for the Oracle Client used as the DSN.

STEP 2: Edit the file %MiddleWare_Home%\instances\instance1\bifoundation\OracleBIApplication\coreapplication\setup\bi-init.cmd to set %ORACLE_HOME%\bin as first entry in the PATH.
e.g.
set PATH=%OBIEE_HOME%\bin;%OBIEE_HOME%\bifoundation\server\bin;%OBIEE_HOME%\bifoundation\web\bin;C:\Oracle\BIEE_11g\jre\bin;%windir%;%windir%\system32;%PATH%

STEP 3 Please edit the file %MiddleWare_Home%\instances\instance1\bifoundation\OracleBIApplication\coreapplication\setup\user.cmd to set TNS_ADMIN to your Oracle client tnsnames.ora home directory path (in case exists) or to your OBIEE tnsadmin %OBIEE_Client_Home%\Oracle_BI1\network\admin.
e.g.

set TNS_ADMIN=C:\oracle\product\11.2.0\client_1\network\admin


Oracle Technical Network says you can't test this in online mode, but it is possible by creating a new connection pool and then attempting to 'Import Metadata'. No reboot is required. 

If you pass Step 1:


you have successfully connected to your physical data source using the tnsnames.ora file located in your
app\CookJR\product\11.2.0\dbhome_1 folder. Congrats!

keywords : obiee 11g upgrade, obiee ORACLE_HOME variable, obiee 11g guide, obiee 11g installation, ORA-12154